ShopDreamUp AI ArtDreamUp
Deviation Actions


Suggested Deviants


Suggested Collections


You Might Like…


Description
Hello ^^
Well, many people had asked to me about how I make the lineart of my pictures... Some asked why the lines are smooth, thought that I make them with a tablet T__T;; ... But, it isn't that way, I haven't any tablet [ right now, it is very expensive ;_;.... ]
So, I tried to explain how I do it: [in Corel Photopaint 11, I don't know if the name of the tools are the same in PhotoShop, sorry ]
]
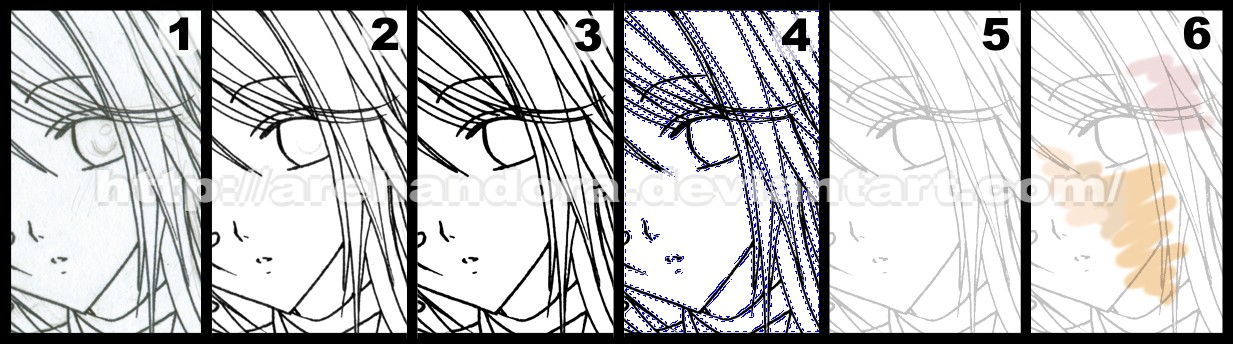
1- I draw a sketch in a paper, then, ink it [by hand] using a marker/liner 0.5 or 0.7mm. [0.0276 inches approx.] and finally scan it at 300dpi [photo mode] ...you still can see the lines in pencil [yes, I didn't erase them... >_> I'm lazy]
2- Using the "contrast/saturation" controls I try to stand out the lineart [giving more contrast and intensity to the pic] ... also I clean some imperfections with the "eraser" tool...
3- Then, using the "gamma" control, I put the gamma at 0,75 approx. ...so, it becomes darker... and the lines stand out again...
4- This way, using the "mask" tool ... I can SELECT ONLY the black color... and become it to an object or layer...
5- Now, the lineart is an object/layer, so I can turn it transparent [at 50 or 60% approx.]
6- ... and finally I can start colouring the picture in a new layer UNDER the lineart... ^_^
I hope it helps to someone! XD;;; I'll move it to scraps later.
Thank you for visiting me!
-------------------------------------------------------------------------
EDIT: Here, tried to explain the same but for Photoshop, thank you so much!
"I don't know if this has already been posted or not...but you said you didn't know about how to do the same thing in Photoshop so i thought i'd post help on that for your viewers *smiles*
1-Using the same ideas as above get your line art brightest white against darkest black.
2-Go into the channels tab and hit "load channels selection" this will automaticaly select all the white areas of your picture as long as your colors are set to black on white.
3-Using the selection tool "select inverse" so now it only traces the lineart itself.
4-Now that your lineart is by itseld go to layers and hit "new layer" button. This will make the line art it's very own layer...i'd name it accordingly.
5-What i do next is hit "Alt+backspace"(make sure your colors are still black on white) and what this will do is make your lineart transparent so thereafter you can make it any color or intensity you want. Unselect the line art with the "Selection tool" and click the "lock transparent pixels" checkbox. Now your lineart can't be messed up. Create your next layer to begin coloring the image!
Hope this helps!"
-------------------------------------------------------------------------
EDIT2: En Español
1- Dibujo el boceto en papel, después lo entinto [a mano] usando un marcador/microfibra 0.5 ó 0.7mm. y finalmente lo escaneo a 300dpi [en modo de fotografía] ... como se puede ver, todavía están las líneas de lápiz que no borré >_>;;;;
2- Usando los controles de "contraste/saturación", trato de resaltar las líneas del dibujo [dándole más contraste e intensidad] ...además, usando la herramienta de borrar, limpio algunas imperfecciones de la imagen...
3- Usando el control de "gamma", hago que las líneas se vuelvan más oscuras, bajando la gamma a 0,75 aproximadamente.
4- Así, usando la herramienta "mascara" puedo seleccionar UNICAMENTE el color negro ... y convertirlo en un objeto o capa...
5- Ahora que las líneas del dibujo ya son una capa/objeto, entonces ya puedo hacerlo transparente [al 50 ó 60% aprox.]
6- ... finalmente, puedo empezar a pintar la imagen en un nuevo objeto/capa DEBAJO de las líneas del dibujo... ^_^
Well, many people had asked to me about how I make the lineart of my pictures... Some asked why the lines are smooth, thought that I make them with a tablet T__T;; ... But, it isn't that way, I haven't any tablet [ right now, it is very expensive ;_;.... ]
So, I tried to explain how I do it: [in Corel Photopaint 11, I don't know if the name of the tools are the same in PhotoShop, sorry
1- I draw a sketch in a paper, then, ink it [by hand] using a marker/liner 0.5 or 0.7mm. [0.0276 inches approx.] and finally scan it at 300dpi [photo mode] ...you still can see the lines in pencil [yes, I didn't erase them... >_> I'm lazy]
2- Using the "contrast/saturation" controls I try to stand out the lineart [giving more contrast and intensity to the pic] ... also I clean some imperfections with the "eraser" tool...
3- Then, using the "gamma" control, I put the gamma at 0,75 approx. ...so, it becomes darker... and the lines stand out again...
4- This way, using the "mask" tool ... I can SELECT ONLY the black color... and become it to an object or layer...
5- Now, the lineart is an object/layer, so I can turn it transparent [at 50 or 60% approx.]
6- ... and finally I can start colouring the picture in a new layer UNDER the lineart... ^_^
I hope it helps to someone! XD;;; I'll move it to scraps later.
Thank you for visiting me!
-------------------------------------------------------------------------
EDIT: Here,
tried to explain the same but for Photoshop, thank you so much! "I don't know if this has already been posted or not...but you said you didn't know about how to do the same thing in Photoshop so i thought i'd post help on that for your viewers *smiles*
1-Using the same ideas as above get your line art brightest white against darkest black.
2-Go into the channels tab and hit "load channels selection" this will automaticaly select all the white areas of your picture as long as your colors are set to black on white.
3-Using the selection tool "select inverse" so now it only traces the lineart itself.
4-Now that your lineart is by itseld go to layers and hit "new layer" button. This will make the line art it's very own layer...i'd name it accordingly.
5-What i do next is hit "Alt+backspace"(make sure your colors are still black on white) and what this will do is make your lineart transparent so thereafter you can make it any color or intensity you want. Unselect the line art with the "Selection tool" and click the "lock transparent pixels" checkbox. Now your lineart can't be messed up. Create your next layer to begin coloring the image!
Hope this helps!"
-------------------------------------------------------------------------
EDIT2: En Español
1- Dibujo el boceto en papel, después lo entinto [a mano] usando un marcador/microfibra 0.5 ó 0.7mm. y finalmente lo escaneo a 300dpi [en modo de fotografía] ... como se puede ver, todavía están las líneas de lápiz que no borré >_>;;;;
2- Usando los controles de "contraste/saturación", trato de resaltar las líneas del dibujo [dándole más contraste e intensidad] ...además, usando la herramienta de borrar, limpio algunas imperfecciones de la imagen...
3- Usando el control de "gamma", hago que las líneas se vuelvan más oscuras, bajando la gamma a 0,75 aproximadamente.
4- Así, usando la herramienta "mascara" puedo seleccionar UNICAMENTE el color negro ... y convertirlo en un objeto o capa...
5- Ahora que las líneas del dibujo ya son una capa/objeto, entonces ya puedo hacerlo transparente [al 50 ó 60% aprox.]
6- ... finalmente, puedo empezar a pintar la imagen en un nuevo objeto/capa DEBAJO de las líneas del dibujo... ^_^
Image size
1233x344px 143.6 KB
© 2007 - 2024 Arehandora
Comments202
Join the community to add your comment. Already a deviant? Log In
Does anyone know where the "load channels selection" thing is on photoshop 11?