ShopDreamUp AI ArtDreamUp
Deviation Actions


Suggested Deviants


Suggested Collections


![Tutorial - Bubbles [light BG]](https://images-wixmp-ed30a86b8c4ca887773594c2.wixmp.com/f/dc4d1645-b190-47ea-a3f3-292a60801f76/d9ulg9x-bb723183-047f-46cb-9040-7db25a9882bd.png/v1/crop/w_184,h_184,x_1,y_0,scl_0.184,q_70,strp/tutorial___bubbles__light_bg__by_hyan_doodles_d9ulg9x-92s-2x.jpg?token=eyJ0eXAiOiJKV1QiLCJhbGciOiJIUzI1NiJ9.eyJzdWIiOiJ1cm46YXBwOjdlMGQxODg5ODIyNjQzNzNhNWYwZDQxNWVhMGQyNmUwIiwiaXNzIjoidXJuOmFwcDo3ZTBkMTg4OTgyMjY0MzczYTVmMGQ0MTVlYTBkMjZlMCIsIm9iaiI6W1t7ImhlaWdodCI6Ijw9MTAwMCIsInBhdGgiOiJcL2ZcL2RjNGQxNjQ1LWIxOTAtNDdlYS1hM2YzLTI5MmE2MDgwMWY3NlwvZDl1bGc5eC1iYjcyMzE4My0wNDdmLTQ2Y2ItOTA0MC03ZGIyNWE5ODgyYmQucG5nIiwid2lkdGgiOiI8PTEwMjgifV1dLCJhdWQiOlsidXJuOnNlcnZpY2U6aW1hZ2Uub3BlcmF0aW9ucyJdfQ.IMqhIToc_ClFLDu2djpzEOMSXtwwVReXkJ9BC51XDPM)
![Tutorial - Bubbles [light BG]](https://images-wixmp-ed30a86b8c4ca887773594c2.wixmp.com/f/dc4d1645-b190-47ea-a3f3-292a60801f76/d9ulg9x-bb723183-047f-46cb-9040-7db25a9882bd.png/v1/crop/w_92,h_92,x_1,y_0,scl_0.092,q_70,strp/tutorial___bubbles__light_bg__by_hyan_doodles_d9ulg9x-92s.jpg?token=eyJ0eXAiOiJKV1QiLCJhbGciOiJIUzI1NiJ9.eyJzdWIiOiJ1cm46YXBwOjdlMGQxODg5ODIyNjQzNzNhNWYwZDQxNWVhMGQyNmUwIiwiaXNzIjoidXJuOmFwcDo3ZTBkMTg4OTgyMjY0MzczYTVmMGQ0MTVlYTBkMjZlMCIsIm9iaiI6W1t7ImhlaWdodCI6Ijw9MTAwMCIsInBhdGgiOiJcL2ZcL2RjNGQxNjQ1LWIxOTAtNDdlYS1hM2YzLTI5MmE2MDgwMWY3NlwvZDl1bGc5eC1iYjcyMzE4My0wNDdmLTQ2Y2ItOTA0MC03ZGIyNWE5ODgyYmQucG5nIiwid2lkdGgiOiI8PTEwMjgifV1dLCJhdWQiOlsidXJuOnNlcnZpY2U6aW1hZ2Uub3BlcmF0aW9ucyJdfQ.IMqhIToc_ClFLDu2djpzEOMSXtwwVReXkJ9BC51XDPM)


Description
KONNICHI WA!!!! GOOD AFTERNOON!!!! BUENAS TARDES!!!! 
[FORGIVE MY POOR ENGLISH PLEASE]
Well, to paint with the computer, I use the Corel Photopaint 11, though the nº 8, 9 and 10 have the same tools basically…. It is similar to the Adobe Photoshop…
And of course, I NEVER studied how to draw or to paint (neither anything like that), so, my way to CG is NOT THE ONLY ONE, you can find your own method....")
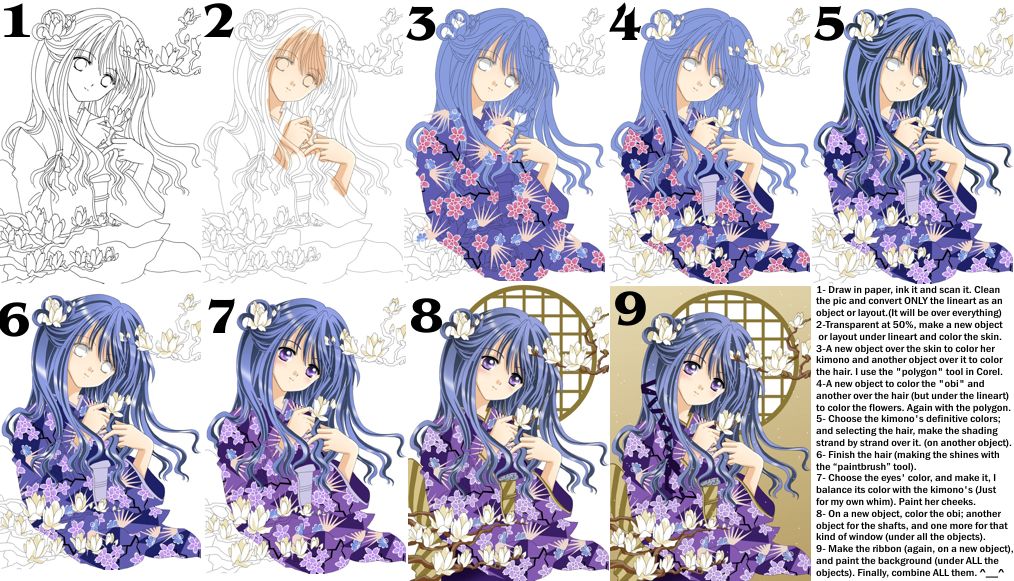
So, I draw the image that I want, ink it, and scan it with a resolution at least 300 dpi, at 100% and “black and white Photo” mode or something like that. Then, I open the image in the Corel Photopaint 11, turn it to “RGB color mode” …and with the contrast/saturation controls, I can stand out the art-line (clean it) to be able to select it with a "mask" (example: the “magic wand"), and this way I can transform it into a "object" (or "layout" if you are in the Photoshop) in the menu: OBJECT=> CREATE => CUT SELECTION. After this, everything is like a "cell" or an acetate, I mean, under this object (with your line-art), you can add all the objects that you need (menu: OBJECT=>CREATE=>NEW OBJECT) to go coloring it part by part of the picture, I do it with the tool: “Polygon” (example: in an object I do the skin of my character: face, hands, legs, …HOW? .. I choose the orange color -in the palette- so I continue -with the polygon and patience - the line-art of my pic for create my object, then I add another object above, and there I make the clothes... and this way with everything….). But why to color on objects????… Well, if you color a flower on an object, and then you add another above it to paint the leafs, is as if you added a tracing paper, so everything that you “paint//erase” there don’t affect your previous object … for this reason I think it is better for the shading (with the “paintbrush” tool), you can select the object with a mask, so, the color doesn't disperse to everywhere... ….., after you finished everything, you can put a background (if you want) and Zashhhhh!!!! You combine all the objects with the background (menu: OBJECT => to COMBINE=> ALL THE OBJECTS WITH THE BACKGROUND)!! THE END.
OMG, English is sooooooo hard!!!!;___; …I hope you can understand it, because it is difficult to explain to me…
Anyway, thanks for reading it!
EN ESPAÑOL ES MAS FACIL!!! (porque yo puedo hablar español!!!  Aha haha hah ha ha ha ha ha….
  )
)
En primer lugar, para pintar, yo uso el Corel Photopaint 11, aunque el nº 8, 9 y 10 tienen básicamente las mismas herramientas…. Como así tambien el Adobe Photoshop, casi todos se parecen bastante…
Además está muy claro que yo JAMÁS estudié dibujo ni pintura (ni nada por el estilo) y por lo tanto la manera en que lo hago NO ES LA UNICA QUE EXISTE, NI LA UNICA VALIDA, tu puedes encontrar tu propio método…
Así que primero dibujo la imagen que quiero, la entinto y la “escaneo” con una resolución de por lo menos 300 dpi, al 100% y en modo “foto blanco y negro” o algo por el estilo. Después, abro la imagen en el Corel Photopaint 11, la paso a modo “color RGB” y con los controles de contraste/saturación/brillo, hago que resalten bien las líneas del contorno de mi dibujo para después poder seleccionarlas con una “máscara” (por ejemplo la “máscara varita mágica”), y así convertirlas en un “objeto” (o “capa” si están en el Photoshop) en el menú: OBJETO=> CREAR=>CORTAR SELECCION. Luego, todo se desarrolla como un “cell” o un acetato, es decir, DEBAJO de este objeto (con las lineas de contorno del dibujo), agrego todos los objetos que necesite (OBJETO=> CREAR=> NUEVO OBJETO) para ir pintando parte por parte del dibujo, que dicho sea de paso, lo hago con la herramienta “Polígono” (ej: en un objeto pinto todo lo que es piel: cara, manos, piernas, …CÓMO? ..Elijo de la paleta de colores, el color anaranjado y después voy siguiendo –con el polígono y con mucha paciencia - las líneas de contorno del dibujo hasta armar mi objeto, luego agrego otro objeto encima, y ahí pinto todo lo que es ropa….. y así con todo….), Pero, ¿por qué pintar todo en objetos???? ….bueno, si tu pintas una flor en un objeto, y luego agregas otro encima para pintar las hojas, es como si agregaras un papel de calcar, y todo lo que pintes//borres ahí NO va a afectar lo que ya hayas hecho en otro objeto de más abajo……, …..por eso pienso que es práctico para sombrear (usando el la herramienta “pincel”) sin estropear lo que ya estaba pintado, además puedes poner una máscara en el objeto para que el color no se escape a los costados. Después que terminaste todo, le puedes poner un fondo (si tu quieres) y Zashhhhh!!!! Combinas todos los objetos con el fondo (OBJETO=>COMBINAR=>TODOS LOS OBJETOS CON EL FONDO) y LISTO!!
Bueno, espero haberme explicado más o menos, es difícil de contar lo que uno hace para pintar por escrito… T__T
Pero en fin, espero que al menos les sirva de algo…
Nos vemos, See you, Mata ne!!!!!!!!!!

[FORGIVE MY POOR ENGLISH PLEASE]
Well, to paint with the computer, I use the Corel Photopaint 11, though the nº 8, 9 and 10 have the same tools basically…. It is similar to the Adobe Photoshop…
And of course, I NEVER studied how to draw or to paint (neither anything like that), so, my way to CG is NOT THE ONLY ONE, you can find your own method....
So, I draw the image that I want, ink it, and scan it with a resolution at least 300 dpi, at 100% and “black and white Photo” mode or something like that. Then, I open the image in the Corel Photopaint 11, turn it to “RGB color mode” …and with the contrast/saturation controls, I can stand out the art-line (clean it) to be able to select it with a "mask" (example: the “magic wand"), and this way I can transform it into a "object" (or "layout" if you are in the Photoshop) in the menu: OBJECT=> CREATE => CUT SELECTION. After this, everything is like a "cell" or an acetate, I mean, under this object (with your line-art), you can add all the objects that you need (menu: OBJECT=>CREATE=>NEW OBJECT) to go coloring it part by part of the picture, I do it with the tool: “Polygon” (example: in an object I do the skin of my character: face, hands, legs, …HOW? .. I choose the orange color -in the palette- so I continue -with the polygon and patience - the line-art of my pic for create my object, then I add another object above, and there I make the clothes... and this way with everything….). But why to color on objects????… Well, if you color a flower on an object, and then you add another above it to paint the leafs, is as if you added a tracing paper, so everything that you “paint//erase” there don’t affect your previous object … for this reason I think it is better for the shading (with the “paintbrush” tool), you can select the object with a mask, so, the color doesn't disperse to everywhere... ….., after you finished everything, you can put a background (if you want) and Zashhhhh!!!! You combine all the objects with the background (menu: OBJECT => to COMBINE=> ALL THE OBJECTS WITH THE BACKGROUND)!! THE END.
OMG, English is sooooooo hard!!!!;___; …I hope you can understand it, because it is difficult to explain to me…
Anyway, thanks for reading it!
EN ESPAÑOL ES MAS FACIL!!!
En primer lugar, para pintar, yo uso el Corel Photopaint 11, aunque el nº 8, 9 y 10 tienen básicamente las mismas herramientas…. Como así tambien el Adobe Photoshop, casi todos se parecen bastante…
Además está muy claro que yo JAMÁS estudié dibujo ni pintura (ni nada por el estilo) y por lo tanto la manera en que lo hago NO ES LA UNICA QUE EXISTE, NI LA UNICA VALIDA, tu puedes encontrar tu propio método…
Así que primero dibujo la imagen que quiero, la entinto y la “escaneo” con una resolución de por lo menos 300 dpi, al 100% y en modo “foto blanco y negro” o algo por el estilo. Después, abro la imagen en el Corel Photopaint 11, la paso a modo “color RGB” y con los controles de contraste/saturación/brillo, hago que resalten bien las líneas del contorno de mi dibujo para después poder seleccionarlas con una “máscara” (por ejemplo la “máscara varita mágica”), y así convertirlas en un “objeto” (o “capa” si están en el Photoshop) en el menú: OBJETO=> CREAR=>CORTAR SELECCION. Luego, todo se desarrolla como un “cell” o un acetato, es decir, DEBAJO de este objeto (con las lineas de contorno del dibujo), agrego todos los objetos que necesite (OBJETO=> CREAR=> NUEVO OBJETO) para ir pintando parte por parte del dibujo, que dicho sea de paso, lo hago con la herramienta “Polígono” (ej: en un objeto pinto todo lo que es piel: cara, manos, piernas, …CÓMO? ..Elijo de la paleta de colores, el color anaranjado y después voy siguiendo –con el polígono y con mucha paciencia - las líneas de contorno del dibujo hasta armar mi objeto, luego agrego otro objeto encima, y ahí pinto todo lo que es ropa….. y así con todo….), Pero, ¿por qué pintar todo en objetos???? ….bueno, si tu pintas una flor en un objeto, y luego agregas otro encima para pintar las hojas, es como si agregaras un papel de calcar, y todo lo que pintes//borres ahí NO va a afectar lo que ya hayas hecho en otro objeto de más abajo……, …..por eso pienso que es práctico para sombrear (usando el la herramienta “pincel”) sin estropear lo que ya estaba pintado, además puedes poner una máscara en el objeto para que el color no se escape a los costados. Después que terminaste todo, le puedes poner un fondo (si tu quieres) y Zashhhhh!!!! Combinas todos los objetos con el fondo (OBJETO=>COMBINAR=>TODOS LOS OBJETOS CON EL FONDO) y LISTO!!
Bueno, espero haberme explicado más o menos, es difícil de contar lo que uno hace para pintar por escrito… T__T
Pero en fin, espero que al menos les sirva de algo…
Nos vemos, See you, Mata ne!!!!!!!!!!
Image size
1014x581px 186.4 KB
© 2005 - 2024 Arehandora
Comments63
Join the community to add your comment. Already a deviant? Log In
Gracias por el tutorial! Saludos desde Chile! 8D